
On this page you can read all about what I have done, and will do,
to acheve the best possible sound-experience,
without getting completely ruined...
I have made this page just to let you know about my experiences.
I am not trying to sell anything,
but I hope I can give one and another a good idea of what to to with their car...
I have made this project on my BMW 325-cabrio, but I think that if you have just about any car
some of this info could be of interest...
Yours sincerly
Björn Holmberg
Most of the pictures are clickable!

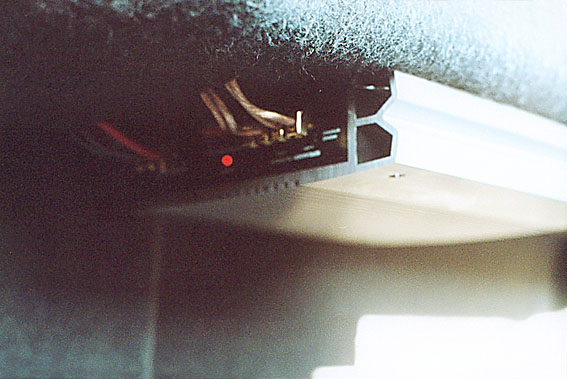
My amplifier, mounted hanging under my cabrio-box.

Above is the description of my system.
Four 5,25" SONY XPlod midrangers

Powered by the built-in amplifier in the main-unit, (4 X 35W)
Two 10" Boxer Subwoofers, from Zachry (250W each)
Powered by a Zachry Powerstation 300, amplifier with an internal crossover
Down below, you can follow the work, and how it was done.
First of all I had to make way for the woofers, and cables.
The cables are a verry important issue,
since it doesn't matter how expensive or good speakers you mount.
If the power or signals can't get throug, it's just never going to end up performing good.
I started up by dismounting all carpets inside the car and in the boot,
the backseat of course, and some of the panels...
I ripped out all the old speakercables.
It's a shame that BMW doesn't understand the importance of the cables thicknes.
Theese cables would have been better used for sewing than as audiotransmitters.
As I mounted the new speakercables (2,5 mm2),
I also put in two 25 mm2 cables for the DC-power to the amplifier.
I don't think the way I mounted the 5,25" midrangers in the holes after the pre-mounted speakers
in the backseats armrest, and kick-panels in the front, interest anyone so that's that.

To the more interesting things then...
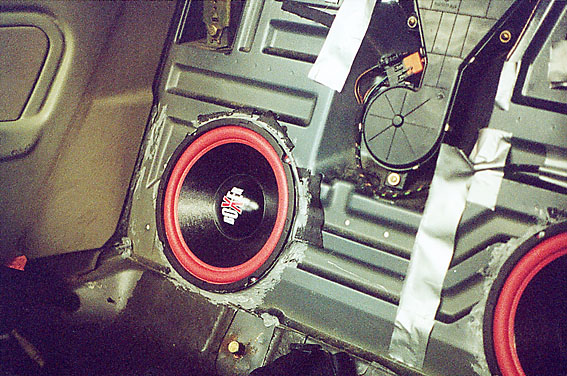
To the BASS-ISSUE!
To make way for the woofers,
I started up by drilling holes aprox. 1 cm inside of my markings, with 5-8 cm between each hole,
then I borrowed a friends electrical hacksaw, to saw between the holes.


The remaning 1 cm I removed with a hand-driven file...
It took me in total aprox. six hours, I'm sure there is an easier way, but that's how I dit it.
I did it that way, because if the holes get too big,
it's just about to buy bigger woofers, and file up the holes to one size bigger...
It must be possible to resolve all gaps between the element and the body.
When the holes finaly had the right size,
I flattened the surface around the mounting-area with a pair of pilors and a hammer.
Not flattened to exelence, but flat enuff to test-mount the speakers.

Since the cabrio has double walls between the passenger-area and the boot,
screws and nuts, was not the ideal way to mount...
Instead I used nut-clips, just drill a hole where desired, snap on a clip, and screw.
Just like factory-fit!
Then to what now has become a wooferbox,
All existing gaps in the body around the box must be tightened, securely.
The easyest way is to use a product called NoiseKiller. (is availible in three diferent stiffneses)
Just spray into all gaps you can find, with the stiffest one.
use the one recomended for all other surfaces inside the box
I used a type of fixing-fluid, but the NoiseKiller is much better.
Now there will be a couple of quite big holes left in the rear wall.
For best result, put a net over them, and secure them with plastic
Those holes are not that important to tighten emedietly, since the importance should be focused to the mounting-wall.
I simply put some Gaffer-tape over them since I also have my speakercables going thru those holes.
I finalized the box by filling the whole box with two 1 m2 damper-wool-sheets.

When the elements are securely mounted, it may still be some gaps between the speaker and the body.
Do NOT try to solve this problem by tighten the screws, untill the gap disappears!
That will only skew the elements border, wich in worst case will result in need for new spekers...
I removed the elements, and put some fixing-fluid on the border, then remounted
and filled the rest with the same fixing-fluid...
However, I do not wish to recomend that, since, if you shange your mind, it will not be easy to remove the speakers...
Instead I would like to recomend, som kind of rubber lists, like you have to tighten house-windows


Now to the mounting of the amplifier
I mounted mine hanging in the cabrio-box
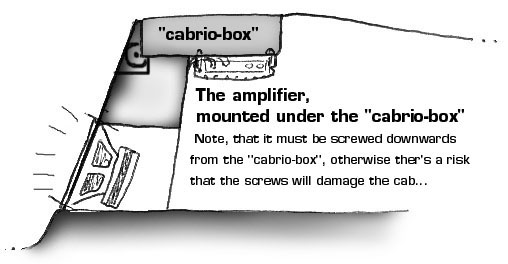
First I put the amplifier in the bottom of the cabrio-box, to get the messurements of where to drill the holes.
Then to the hard part about this mounting-way.
Since it's not possible to have both the boot-hach and the cabrio-box-hach opened at the same time...
I built a tower, wich upon I placed the amp. inside the boot
so that it was fairly fixed towards the bottom of the cabrio-box.
Inside the mounting-holes in the amp. I fixed aloy-plates with Gaffer-tape, temporarily.
On theese aloy-plates I had snapped on nut-clips.
When the amp. was fixed in position for the holes,
I closed the boot-hach, and entered the cabrio-box-hach,
to try and find the holes for the nut-clips...
The longer screws you use here, the easyer it gets!
I used 4,5cm-screws, but use as long as possible.
Don't use, like, 10cm long ones thoe, since they will be visible from the boot,
wich never looks nice...
-Oh, I almost forgot!
Don't forget to put the boot-carpet in place before mounting the amp.
I did, so I had to mount my amp. twice, and it is a bit tricky...
The mounting of my PowerBlocks was verry easy.
I screwed them in a pice of wood, that I placed behind the carpet.
When I was satisfied with the placing of the amp. and the powerblocks,
I carved out one small hole in the carpet for each cable, and struggled thrue each cable
so that is should look as tidy as possible...

I hope this page will make people understand,
that, good a car-audio isn't that expensive and hard to make.
This describes a verry simple and easy example of how to get good sound out of your car.
It's not enough for competition-use, but if youre in to that stuff, you probably already knew all of this already...
WARNING
All material on theese pages are copyright, of course,
and may not be used by any others for profit or non-profit, without written permission from the webmaster of this site.
Webmaster
Björn Holmberg
Back